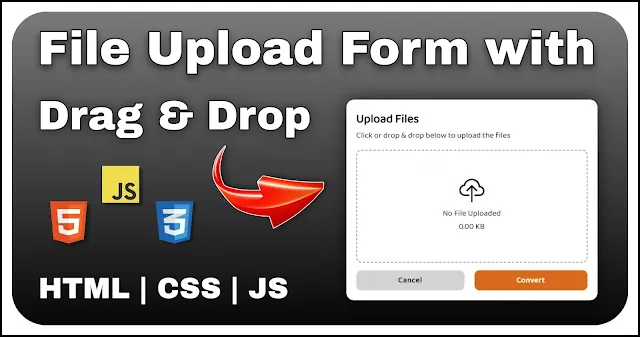
Create a File Upload Form with Drag and drop functionality using JavaScript
Uploading files is a common feature in many web applications and having a user-friendly and visually appealing file upload form can significantly enhance the user experience. This tutorial will guide you through creating a modern file upload form using HTML, CSS and JavaScript. By the end of this guide, you’ll have a sleek and functional file upload interface that you can integrate into your projects.
Also Read: Create Draggable Element using HTML CSS and JS
In this tutorial, we build a modern file upload form that provides a clean design, interactive elements and smooth user interactions. Let’s break down the structure, styling and functionality used in this post and how you can customize it for your own needs.
HTML Structure
The HTML markup sets up a basic structure for the file upload form. We use a form element (<form>) to contain all the components of the upload interface. The key elements include:
<form class="upload-wrapper">
    <h2>Upload Files</h2>
    <p>Click or drop & drop below to upload the files</p>
    <div class="upload-zone">
      <div class="icon bi bi-cloud-upload"></div>
      <p class="file-name">No File Uploaded</p>
      <p class="file-size">0.00 KB</p>
      <input type="file" id="input-file" name="file" accept="image/*" required>
    </div>
    <div class="action-btns">
      <button type="reset" id="reset-btn">Cancel</button>
      <button type="submit" id="convert-btn">Convert</button>
    </div>
</form>- Heading and Instructions: A heading (<h2>) and a paragraph (<p>) to provide context and instructions for the user.
- Upload Zone: A div with the class upload-zone that acts as the drop zone for files. It contains an icon for visual indication and a file info section to display the file name and size.
- Input Element: An hidden input element which covers the full upload zone area to handle file selection.
- Action Buttons: Two buttons for cancelling the upload and submitting the file.
This structure allows us to manage file uploads in a user-friendly manner.
CSS Styling
The CSS styles focus on creating an attractive and functional upload form. Key features include:
@import url(https://fonts.googleapis.com/css2?family=Baloo+Bhai+2:wght@400&display=swap);
@import url(https://cdn.jsdelivr.net/npm/bootstrap-icons@1.11.3/font/bootstrap-icons.min.css);

body {
  display: flex;
  min-height: 100vh;
  align-items: center;
  background: #f1f1f1;
  justify-content: center;
  font-family: 'Baloo Bhai 2';
}

.upload-wrapper {
  display: grid;
  width: 500px;
  height: 400px;
  padding: 20px;
  border-radius: 15px;
  background-color: white;
  grid-template-rows: auto auto 1fr auto;
  box-shadow: 0px 0px 10px 1px rgba(0, 0, 0, 0.256);
}

.upload-zone {
  width: 100%;
  display: grid;
  margin: 15px 0;
  cursor: pointer;
  position: relative;
  text-align: center;
  border-radius: 10px;
  justify-items: center;
  align-content: center;
  border: 1.6px dashed #00000070;
}

#input-file {
  position: absolute;
  left: 0;
  top: 0;
  bottom: 0;
  right: 0;
  cursor: pointer;
  opacity: 0;
}

.bi-cloud-upload {
  line-height: 1;
  font-size: 50px;
}

.action-btns {
  display: flex;
  gap: 20px;
}

button {
  flex-grow: 1;
  border: none;
  padding: 8px;
  font-size: 15px;
  cursor: pointer;
  font-weight: 600;
  border-radius: 10px;
  letter-spacing: .8px;
  font-family: 'Baloo Bhai 2';
  background-color: rgb(211, 211, 211);
}

#reset-btn:hover {
  background-color: rgb(195, 195, 195);
}

#convert-btn {
  background-color: rgb(215, 106, 28);
  color: white;
}

#convert-btn:hover {
  background-color: rgb(234, 123, 43);
}

.is-dragging {
  border: 2px dashed rgb(255, 170, 11);
  background-color: rgba(255, 166, 0, 0.163);
}- The "upload-wrapper" class sets up the form layout with a grid design, ensuring elements are well-organized and responsive.
- The "upload-zone" class is styled with a dashed border, rounded corners and center-aligned content to indicate the drop zone. The icon size and alignment are adjusted for visibility and user interaction.
- The "is-dragging" class changes the border and background color when a file is dragged over the drop zone, providing visual feedback to the user.
These styles ensure the upload form is visually appealing, easy to use and responsive to different screen sizes.
JavaScript Functionality
The JavaScript code handles the interactive aspects of the upload form. It includes:
const uploadBox = document.querySelector('.upload-wrapper')
const uploadZone = document.querySelector('.upload-zone');
const resetBtn = document.querySelector('#reset-btn');
const inputFile = document.querySelector('#input-file');
const fileName = document.querySelector('.file-name');
const fileSize = document.querySelector('.file-size');

const handleOnChange = (file) => {
  fileName.textContent = file.name;
  fileSize.textContent = (file.size / 1024).toFixed(2) + "KB"
}

inputFile.addEventListener("change", (e) => handleOnChange(e.target.files[0]))
uploadBox.addEventListener("submit", (e) => e.preventDefault())

uploadBox.addEventListener("reset", () => {
  fileName.textContent = "No File Uploaded";
  fileSize.textContent = "0.00 KB"
})

uploadZone.addEventListener('dragenter', () => uploadZone.classList.add('is-dragging'));
uploadZone.addEventListener('dragover', (e) => e.preventDefault());
uploadZone.addEventListener('dragleave', (e) => {
  if (!uploadZone.contains(e.relatedTarget)) {
    uploadZone.classList.remove('is-dragging');
  }
});

uploadZone.addEventListener("drop", (e) => {
  e.preventDefault()
  uploadZone.classList.remove('is-dragging')
  handleOnChange(e.dataTransfer.files[0])
})- File Selection and Display: Event listeners on the upload zone and input element handle file selection and update the displayed file name and size. The handleOnChange function updates the file info section when a file is selected or dropped.
- Drag-and-Drop Interactions: Event listeners manage the drag-and-drop interactions, including adding and removing the is-dragging class for visual feedback. Preventing the default behavior for dragover and drop events ensures a smooth file drop experience.
- Form Reset and Submit: Event listeners for form reset and submit events handle the resetting of the file info section and prevent default form submission behavior.
This script enhances the user experience by providing intuitive file selection and clear feedback during interactions. Creating a modern file upload form is an excellent way to improve the user experience on your website.
This tutorial provided a comprehensive guide on building a stylish, responsive and interactive file upload form using HTML, CSS and JavaScript. You now have a template that combines aesthetic appeal with practical functionality. The clean design, intuitive layout and smooth transitions make this upload form an excellent addition to any web project.
Also Read: Image Folding Effect using HTML and CSS | See magic on Hover
You can easily customize the styles and interactions to fit your specific needs, whether you’re building a personal portfolio, a business site, or an application with file upload capabilities. By integrating this file upload form, you can offer your users a seamless and engaging way to upload files, helping to enhance their overall experience on your site.

