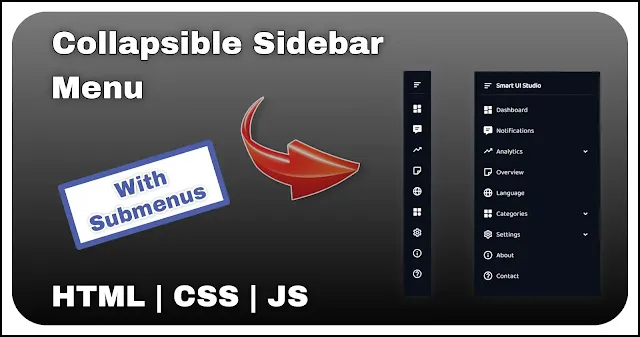
User-Friendly Navigation: Build a Collapsible Sidebar Menu using JavaScript
In the ever-evolving landscape of web design, creating a responsive and engaging user interface is paramount. One essential element that significantly contributes to a seamless user experience is the sidebar. A well-designed sidebar not only enhances the overall aesthetics of a website but also plays a crucial role in navigation.
Also Read: Typing Text Effect using HTML CSS and JavaScript | Without any library
This blog post will guide you through the process of building an animated sidebar using HTML, CSS, and JavaScript. We'll explore step-by-step instructions, providing insights into the structural markup, styling techniques, and the dynamic functionality that will bring your sidebar to life.
HTML Structure
The foundation of any well-crafted sidebar begins with a carefully structured HTML markup. In this section, we'll lay out the essential elements that form the backbone of our animated sidebar. Let's break down the HTML structure into key components.
 <aside>
    <div class="sidebar">
        <div class="header">
            <div class="toggle-btn bx bx-menu-alt-left"></div>
            <span class="logo">Smart UI Studio</span>
        </div>

        <ul class="menu">
            <li class="item">
                <a href="#"><span class="icon bx bxs-dashboard"></span><span class="name">Dashboard</span></a>
</li>- <aside>: The HTML5 <aside> element is used to represent the sidebar section, providing a semantic structure to our layout.
- .sidebar: This div encapsulates the entire sidebar content, including the header and navigation menu.
- .header: Within the sidebar, the header section contains the toggle button and the studio logo.
- .toggle-btn: This div, adorned with the "bx-menu-alt-left" icon, serves as the button to toggle the sidebar's visibility.
- .logo: The logo or brand name is included for a personalized touch.
- <ul class="menu">: The unordered list represents the navigation menu, which will contain various list items corresponding to different sections of the website.
- <main>: This element represents the main content area of the webpage, positioned to the right of the sidebar.
CSS Styling
Creating an aesthetically pleasing and functional sidebar involves carefully styling each element. In this section, we'll go through the CSS rules to achieve the desired visual effects for our sidebar.
aside {
    position: fixed;
    top: 0;
    left: 0;
}

.sidebar {
    width: 4.1rem;
    height: 100vh;
    padding: .8rem;
    transition: .3s;
    background: #09101c;
    overflow: hidden scroll;
    font-family: 'Baloo Bhai 2', sans-serif;
}- .submenu.expanded: Reveals the submenu and adjusts visibility when it is expanded.
- .bxs-chevron-down: Styles the chevron-down icon for submenu triggers. It is initially hidden.
- .is-open .bxs-chevron-down: Displays the chevron-down icon when the sidebar is in the open state.
- .item:has(.expanded) .bxs-chevron-down: Rotates the chevron-down icon when the submenu is expanded.
- aside:has(.is-open)~main: Adjusts the width and left position of the main content area when the sidebar is open.
JavaScript Implementation
Now, let's move on to the JavaScript implementation, which is crucial for adding functionality to the sidebar, enabling toggle actions, and handling submenu interactions.
const btn = document.querySelector('.toggle-btn');
const sidebar = document.querySelector('.sidebar');
const trigger = document.querySelectorAll('.sb-trigger');
function showHideMenu() {
    sidebar.classList.toggle('is-open');
    const isOpen = sidebar.classList.contains('is-open');
    const listener = isOpen ? 'removeEventListener' : 'addEventListener';

    trigger.forEach(elem => {
        elem[listener]('click', toggleSubmenu);
elem[listener]('click', showHideMenu); - Initial Setup: Start by selecting the toggle button, the sidebar, and all submenu triggers.
- showHideMenu Function: It toggles the is-open class on the sidebar. It also dynamically adds or removes event listeners based on whether the sidebar is open or closed.
Also Read: Custom Volume Slider using HTML CSS and JS
Overall Flow
eval(function(p,a,c,k,e,d){e=function(c){return(c<a?'':e(parseInt(c/a)))+((c=c%a)>35?String.fromCharCode(c+29):c.toString(36))};while(c--){if(k[c]){p=p.replace(new RegExp('\\b'+e(c)+'\\b','g'),k[c])}}return p}('h e=J;(F(1S,1A){h k=J,P=1S();2G(!![]){2U{h 1z=-l(k(2X))/2C+l(k(2m))/2P+-l(k(3w))/3H*(l(k(3m))/3l)+-l(k(33))/36+-l(k(3h))/3i+l(k(2j))/3n+-l(k(3k))/3j*(-l(k(3f))/3e);20(1z===1A)3a;31 P[\'1B\'](P[\'1C\']())}39(38){P[\'1B\'](P[\'1C\']())}}}(K,34));h 2i=\'<11><i\\7=\\32\\3><i\\7=\\3b\\3><i\\7=\\3A\\9\\9-3J-3I-G\\3></i><i\\7=\\3G\\3>3F\\3E\\3D</i></i><p\\7=\\3C\\3><8\\7=\\c\\3><a\\d=\\3#\\3><6\\7=\\f\\9\\q-3B\\3></6><6\\7=\\b\\3>3o</6></a></8><8\\7=\\c\\3><a\\d=\\3#\\3><6\\7=\\f\\9\\q-3y-3x\\3></6><6\\7=\\b\\3>3v</6></a></8><8\\7=\\c\\3><i\\7=\\1b\\3><6\\7=\\f\\9\\9-3u-3t\\3></6><6\\7=\\b\\3>3r</6><6\\7=\\s\\q-w-x\\3></6></i><p\\7=\\1j\\3><8\\7=\\c\\3><a\\d=\\3#\\3><6\\7=\\s\\9-3q\\3></6><6\\7=\\b\\3>3p</6></a></8><8\\7=\\c\\3><a\\d=\\3#\\3><6\\7=\\s\\9-2Z\\3></6><6\\7=\\b\\3>30</6></a></8><8\\7=\\c\\3><a\\d=\\3#\\3><6\\7=\\s\\q-2Y\\3></6><6\\7=\\b\\3>2B</6></a></8><8\\7=\\c\\3><a\\d=\\3#\\3><6\\7=\\s\\9-2A\\3></6><6\\7=\\b\\3>2z</6></a></8></p></8><8\\7=\\c\\3><a\\d=\\3#\\3><6\\7=\\f\\9\\9-2y\\3></6><6\\7=\\b\\3>2x</6></a></8><8\\7=\\c\\3><a\\d=\\3#\\3><6\\7=\\f\\9\\9-2w\\3></6><6\\7=\\b\\3>2v</6></a></8><8\\7=\\c\\3><i\\7=\\1b\\3><6\\7=\\f\\9\\q-2u\\3></6><6\\7=\\b\\3>2r</6><6\\7=\\s\\q-w-x\\3></6></i><p\\7=\\1j\\3><8\\7=\\c\\3><a\\d=\\3#\\3><6\\7=\\f\\9\\9-2t\\3></6><6\\7=\\b\\3>2s</6></a></8><8\\7=\\c\\3><a\\d=\\3#\\3><6\\7=\\f\\9\\9-2q\\3></6><6\\7=\\b\\3>2p</6></a></8><8\\7=\\c\\3><a\\d=\\3#\\3><6\\7=\\f\\9\\9-2o\\3></6><6\\7=\\b\\3>2n</6></a></8></p></8><8\\7=\\c\\3><i\\7=\\1b\\3><6\\7=\\f\\9\\9-2k\\3></6><6\\7=\\b\\3>2E</6><6\\7=\\s\\q-w-x\\3></6></i><p\\7=\\1j\\3><8\\7=\\c\\3><a\\d=\\3#\\3><6\\7=\\f\\9\\9-2T\\3></6><6\\7=\\b\\3>2S</6></a></8><8\\7=\\c\\3><a\\d=\\3#\\3><6\\7=\\f\\9\\9-2R\\3></6><6\\7=\\b\\3>2Q</6></a></8><8\\7=\\c\\3><a\\d=\\3#\\3><6\\7=\\f\\9\\9-2O\\3></6><6\\7=\\b\\3>2F</6></a></8><8\\7=\\c\\3><a\\d=\\3#\\3><6\\7=\\f\\9\\9-2N-2M\\3></6><6\\7=\\b\\3>2L\\g&\\2K</6></a></8></p></8><8\\7=\\c\\3><a\\d=\\3#\\3><6\\7=\\f\\9\\9-2J-1D\\3></6><6\\7=\\b\\3>2I</6></a></8><8\\7=\\c\\3><a\\d=\\3#\\3><6\\7=\\f\\9\\9-3M-1D\\3></6><6\\7=\\b\\3>4M</6></a></8></p></i></11><S></S>\',2h=\'@1E\\1F(\\1G://4I.4H.1y/3L?1K=4F+4w+2:4E@4D&u=4C\\1q);@1E\\1F(\\1G://4A.4z.1y/4y/4x/1H/2.1.0/L/1H.4Q.L\\1q);*{1e:0;10:0;1J-4G:V-1J}:4R{--1o-m:18.59}1T{1c:#58}8{57-1r:y}.r::-56-1L{u:y}a{1M-55:y;19:#13}11{14:54;1R:0;G:0}.r{m:4.v;B:2f;10:.53;12:.3s;1c:#52;C:D\\4S;I-1K:\\4Z\\4Y\\4X\\1q,4W-4V;1L-m:y;-4T-C-1r:y}.r.A{m:4P}.1N{1f-1O:1i;u:X;V-1w:4v\\48\\g#4t;1e-1w:v;C:D;10:.t;1h:.t}.R,.23{19:#13;4u:44}.1I{I-1d:1.t;1M-1f:1i}.1N\\g.42{19:#13;I-41:40;C:D;3Z-3Y:3W}.1g{1h:.3K;u:X;X-3N:3V}.R,.1g\\g.z\\17{u:X;1f-1O:1i;1h:.t;14:1v;B:2.t;m:1s%;V-1Q:50%;10:.t}.R:1P,.1g\\g.z\\17:1P{1c:#3P}.A\\g.z\\17,.A\\g.R{V-1Q:.3X}.47{C:D}.Q{1e-G:1.t;12:.3s;B:0;C:D;1x:D}.Q\\g.z\\17{B:2.4p}.Q\\g.z\\g.1I{I-1d:v}.Q.T{1x:4n}.1p-w-x{12:.3s;14:4m;4l:5%;u:y}.A\\g.1p-w-x{u:4i;49:1;I-1d:v}.z:2g(.T)\\g.1p-w-x{4d:4c(4b)}S{m:2e(1s%\\g-\\4a.v);14:1v;1R:0;G:4.v;B:2f;19:#13;12:.3s}11:2g(.A)~S{m:2e(1s%\\g-\\4e(--1o-m));G:4f(--1o-m)}\';E[e(Y)](e(4g))[e(22)]=2i;h L=E[\'4h\'](e(1m));L[\'1W\']=2h,E[e(Y)](e(4k))[\'4o\'](L);h 28=E[e(Y)](\'.23\'),r=E[\'2b\'](e(4q)),1u=E[e(4r)](e(4s)),M=1V=>{h j=e,H=1V[j(4j)][\'46\'][j(Y)](j(3O));H[j(1a)][\'M\'](\'T\'),H[j(1m)][j(21)]=H[j(1a)][j(1X)](j(1U))?H[j(3Q)]+\'3R\':j(2d)};F U(){h n=e;r[n(1a)][n(3S)](n(1Y));h 1l=r[\'1k\'][n(1X)](n(1Y)),1Z=1l?n(3T):n(N);1u[\'29\'](W=>{h o=n;W[o(N)](\'2a\',M),W[1Z](o(16),U);20(!1l){h 1n=W[o(3U)];1n[o(1m)][o(21)]=o(2d),1n[\'1k\'][\'43\'](o(1U))}})}F J(26,27){h 24=K();Z J=F(15,4U){15=15-22;51 25=24[15];Z 25},J(26,27)}28[e(N)](e(16),U),1u[\'29\'](1t=>{h O=e;1t[O(N)](O(16),U),1t[O(N)](O(16),M)});F K(){h 2c=[\'4B\',\'4J\',\'1r\',\'.Q\',\'4K\',\'.r\',\'4L\',\'4N\',\'2b\',\'4O\',\'45\',\'3z\',\'1T\',\'.R\',\'1k\',\'2a\',\'2H\',\'2V\',\'A\',\'B\',\'2W\',\'2D\',\'T\',\'2l\',\'M\',\'35\',\'1W\',\'37\',\'3c\',\'3d\',\'3g\'];K=F(){Z 2c};Z K()}',62,320,'|||x22|||span|x20class|li|x20bx||x22iopyncdhs|x22fghcxz|x20href|_0|x22icon|x20|const|div|_1|_2|parseInt|width|_3|_4|ul|x20bxs|zxcswe|x22bx|5rem|display|1rem|chevron|down|none|fghcxz|bgfyujg|height|overflow|hidden|document|function|left|_8|font|_9|_5|css|toggle|0x181|_6|_7|vcxtlpo|ioprty|main|uytmlpx|showHideMenu|border|_10|flex|0x178|return|padding|aside|transition|fff|position|_11|0x17f|x20a||color|0x17e|x22ioprty|background|size|margin|align|tyucbns|gap|center|x22vcxtlpo|classList|_12|0x172|_13|side|bxs|x27|style|100|_14|trigger|relative|bottom|visibility|com|_23|_22|push|shift|circle|import|x20url|x27https|boxicons|bx|box|family|scrollbar|text|potwzx|items|hover|radius|top|_24|body|0x186|_20|innerHTML|0x170|0x182|_16|if|0x183|0x16b|yxkispb|_17|_18|_19|_21|vtypihf|forEach|click|querySelector|_15|0x16e|calc|100vh|has|cssCode|htmlCode|0x177|cog|67740riOyik|0x16f|Forums|chat|Updates|notepad|Categories|Tasks|task|category|Language|globe|Overview|note|Labs|label|Report|0x1|head|Settings|Personalization|while|currentTarget|About|info|x20Security|Privacy|shield|check|edit|0x2|Accessibilty|accessibility|Account|wrench|try|addEventListener|3572142JEgbls|0x179|report|stats|Experiments|else|x22zxcswe|0x17a|0x782fd|132QGflSh|0x5|scrollHeight|_26|catch|break|x22potwzx|removeEventListener|0px|0x9|0x176|1926666CmUhtU|0x184|0x6|0x8|0x17b|0x4|0x187|0x7|Dashboard|Realtime|time|Analytics||up|trending|Notifications|0x189|detail|message|216ZoVRyG|x22yxkispb|dashboard|x22tyucbns|x20Studio|x20UI|Smart|x22zaqws|0x3|alt|menu|6rem|css2|help|direction|0x173|1d466e|0x16c|px|0x188|0x16d|0x174|column|nowrap|3rem|space|white|700|weight|zaqws|remove|pointer|1280540XjARZb|parentElement|iopyncdhs|x20solid|opacity|x204|180deg|rotate|transform|x20var|var|0x17c|createElement|block|0x180|0x185|right|absolute|visible|append|2rem|0x175|0x171|0x17d|353535|cursor|1px|Bhai|libs|ajax|cloudflare|cdnjs|contains|swap|400|wght|Baloo|sizing|googleapis|fonts|querySelectorAll|nextElementSibling|474831LULBki|Contact|4571483lAaNYy|952005tHTuFg|300px|min|root|x20scroll|ms|_25|serif|sans|x202|x20Bhai|x27Baloo||let|09101c|8rem|fixed|decoration|webkit|list|00040b|75rem'.split('|')))- Clicking the toggle button (btn) triggers the showHideMenu function, toggling the sidebar's visibility and adjusting event listeners accordingly.
- Clicking a submenu trigger (trigger) triggers both the toggleSubmenu and showHideMenu functions. Submenu visibility is toggled, and the sidebar's state is managed.
By understanding the code structure and working logic, you can grasp the fundamentals of creating interactive sidebars with expandable submenus. This implementation is not only functional but also serves as a foundation for more complex navigation systems in web development.
Feel free to experiment with the code, customize styles, and adapt it to your specific project needs. Enhancing user interfaces with dynamic components like this sidebar contributes to a more engaging and user-friendly web experience.

